")
")

Watched any movies lately? Chances are there’s more going on in the production than meets the eye. Producers save millions in production costs and hassle simply with a bit of movie magic. Enter the green screen, formally known as chroma key,
where you can transport actors into any location without leaving the studio!
Stand in front of your green screen, pull up your copy of DaVinci Resolve, and you’ll be standing anywhere you want with just a few clicks!
We assume you’ve already shot your green screen footage in this tutorial. We’ll use DaVinci Resolve v17.4.6 to remove the green screen.
Remember, a good outcome is only as good as your preparation. Therefore, ensure that the green screen and your subject are evenly lit for the best results.
How the green screen process works
A couple of things that aren’t common knowledge is that green screens aren’t always green. Sometimes they’re blue or a different color. And the professional film and video industry don’t call ’em green screens, either. The industry term for this process is Chroma key.
We use video editing software like DaVinci Resolve to chroma’ key’ out or delete the green screen behind the subject in post-production.
In the final result, the subject is the only thing in the shot, leaving you to change the background however you wish!
Step 1: Ingest your footage into DaVinci Resolve
Press Command ⌘ + I (Control + I in Windows) to bring up the footage ingestion window (where you will browse for your footage). Select the clips you want to use and press Open. The clips you want to import are
- The Chroma key clip (the one with the subject and green screen).
- The Background clip, which we’ll ultimately see behind the subject.

Step 2: Drag your clips into the Timeline
The Timeline is where the footage is inserted and arranged for editing use.
Drag and drop your Background Clip into the Timeline in the Video 1 channel. Drag your Green screen Clip on the Video 2 channel.

Step 3: Select a green-colored segment to chroma key out
- Click on the Color tab at the bottom of DaVinci Resolve’s workspace. It’s the icon that looks like a rainbow flower.

Select the Color tab. It’s the fourth from the left of the bottom icons. - Click on the 3D Qualifier icon. It is the eyedropper icon highlighted in the screenshot. The Qualifier-3D window will become active, revealing your options on the left-hand side of the Color Workspace.

Activate the 3D Qualifier window by clicking on its icon. - In the Qualifier-3D window, click on the Color Picker Eyedropper, the farthest eyedropper to the left. We’re going to use that to select the green in the video.

Activate the Color Picker Eyedropper, then left-click anywhere on the green portion of the power window. - Next, click on a green part anywhere in the Power Window (where we see our footage). If you can’t see your green screen footage, select it from the clips right above the middle row of icons. Ensure you are only selecting the bright green of the green screen and no other area.
Step 4: Key out the Green
- Right-click anywhere on the grid in the gridded window to the right of the Power Window. A dialog will pop up. Select Add Alpha Output. The small box with a tiny version of the Power Window is called a Node.
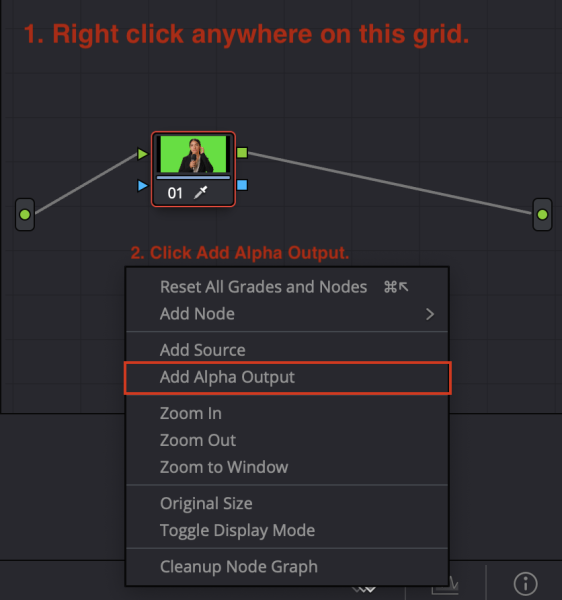
Right-click on the grid, then select Add Alpha Output. - After clicking Add Alpha Output, a blue square will appear on the right side of the node and a blue circle on the grid not far from the node box.
- Click on the blue square on the Node, and drag-click it in a line to the blue circle on the right. Pretty weird, right?

Drag and click the blue square to the blue dot on the right, connecting the two. - Now the background is visible through the silhouette of your subject!
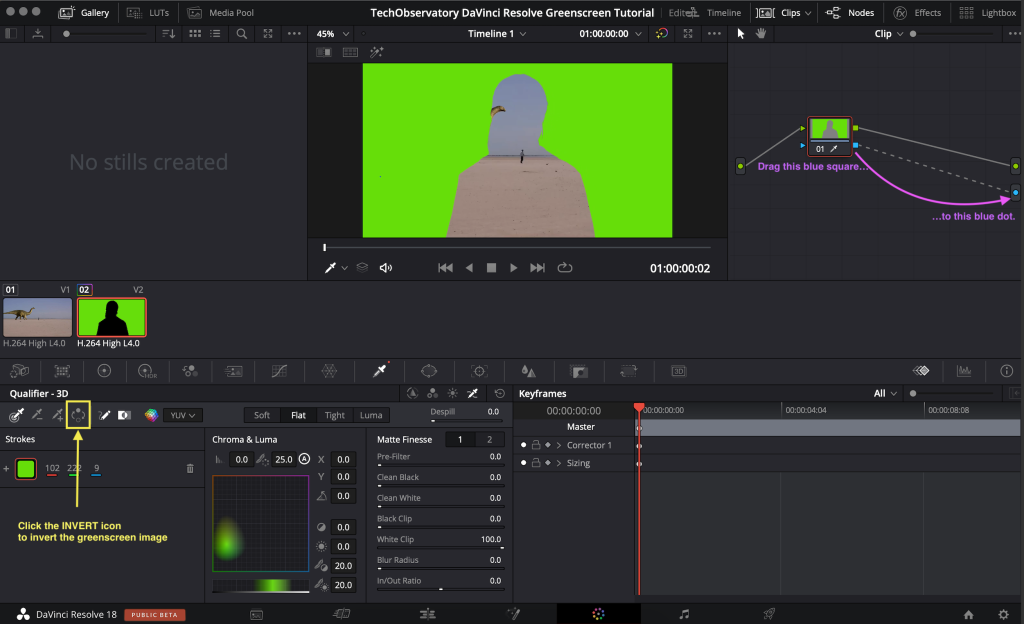
This is what you should see after successfully inverting the green screen. The subject disappears to reveal the background. - We want the opposite – our subject to appear and the green background to vanish. So, let’s go back to that little row of eyedroppers to the left in the Qualifier – 3D section and select the Invert icon. It’s the one with the “spinny” arrow.

Select the Invert Icon to invert the green screen part of the image. - There you go! The green of the chroma key is “keyed out” or removed from the image. Your subject is now in front of your background footage! We are nearly done!

This is what we see after clicking on the Invert Icon. Your subject is now in front of your background.
Step 5: Cleaning up and applying finishing touches
Nearly done! If there’s still a green “halo” or outline around your subject, zoom in to your subject (either by rolling your mouse wheel or pressing SHIFT + F on your keyboard).
We can remove the remaining green screen remnants in a few ways.
- The quickest way is to use the DE-SPILL slider, which removes the “spill” from any green reflection.
- Use the Matte Finesse sliders to draw back any part of the “halo” until most of the green is gone. Then, use the Picker Add (the eyedropper with the + sign) along the margins to get rid of the rest. The Feather options can also be used to “feather” out any extra remnants of green.

Use the highlighted functions to select and adjust the visibility of the green halo on the subject. Either way, you can make gradual adjustments with a combination of these options to reach the sweet spot where only your subject will remain.
- Play the footage all the way through to ensure no green halo remains in the image. Press the Right Left Arrow Keys to move your footage frame by frame for the best level of inspection.

And there you have it, a quick and easy way to green screen in DaVinci Resolve!